CREATING A MANUAL BACKUP
To create a manual backup:
- Go to Services > My Services
- Find the domain you want to manually backup. Click “Activate”.
- Click “Login to Plesk Control Panel”.
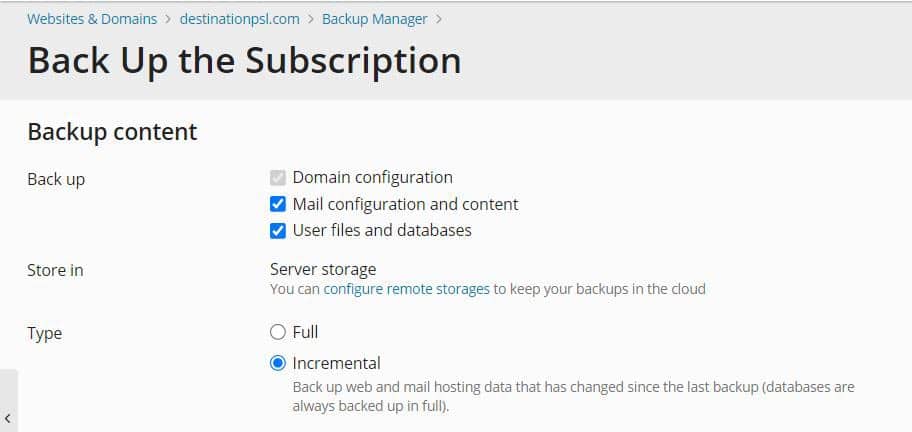
- Go to Websites & Domains > Backup Manager > Back up.
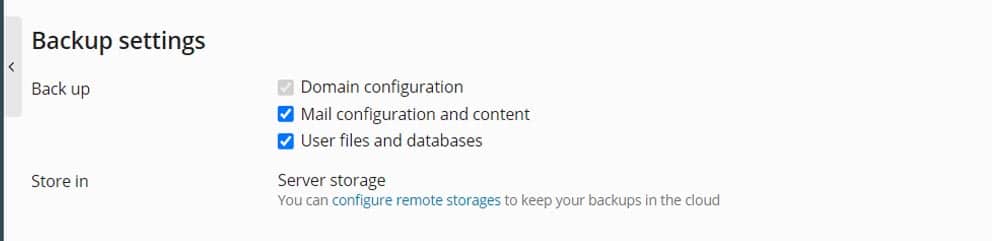
- Under “Back up”, you can select which content you want to back up. Domain configuration is always included in backups. You can choose to exclude “Mail configuration and content” and/or “User files and databases” by clearing the corresponding checkboxes.
- Under “Store in”, you can change where the backup must be stored. By default, backups are stored on the Plesk server. If you have configured remote storage, you can store backups in the remote storage by selecting the corresponding radio button.
- Under “Type”, select the backup type by selecting the corresponding radio button:
- A “Full” backup includes all data you specified during step 2.
- An “Incremental” backup contains only the files that changed since the last previously created backup. Incremental backups are created quicker and take up less disk space than full backups. However, to restore an incremental backup, you must have the corresponding full backup and all previously created incremental backups available.Note: If you have no backups, the first created backup will always be a full one. You will be able to choose the backup type (full or incremental) for successive backups. If you selected only “Domain Configuration” during step 2, you can only create a full backup.
8. If you selected the remote storage option during step 3, you can split the backup file into volumes. Select the “Create a multivolume backup, volume size (MB)” checkbox, and then specify the volume size. This can be useful if the remote storage places restrictions on the maximum file size.
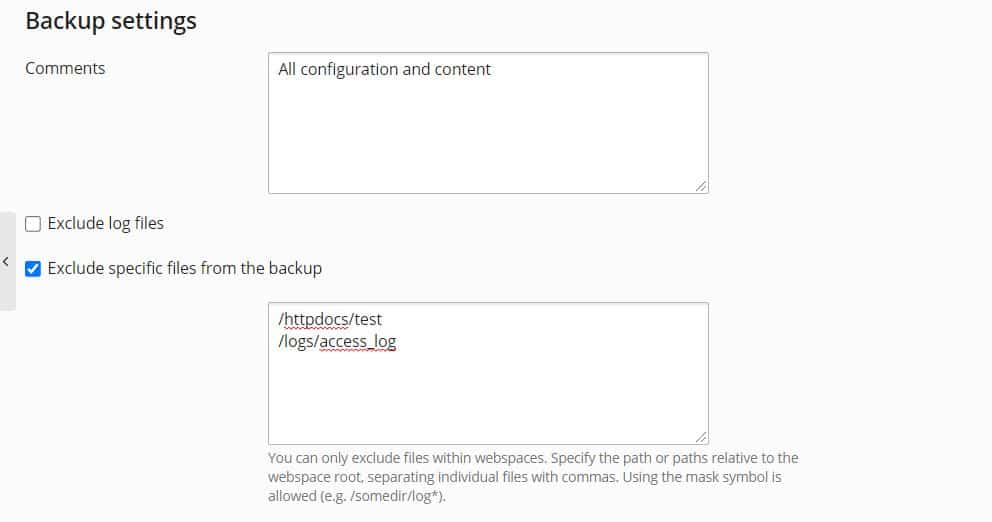
9. At this point, the backup is ready to be created. There is a number of optional settings you can configure before creating the backup:
- Leave a comment about the backup being created under “Comments”. Comments are visible in the Plesk interface and can help you tell one backup from another.
- To exclude log files from the backup, select the “Exclude log files” checkbox. This can decrease the amount of disk space taken up by the backup.
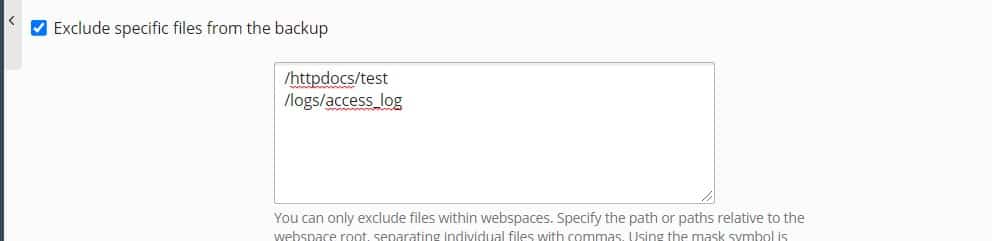
- To exclude specific files or directories from the backup, select the “Exclude specific files from the backup” checkbox. Type the path or paths to the directories or files you want to exclude in the field below. Paths must be relative to your home directory, for example:
10. Click OK to create the backup.
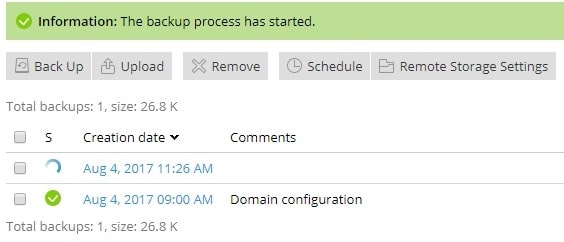
You will be returned to the Websites & Domains > Backup Manager screen where you can see the backup being created. The backup process can take some time to finish depending on the size of content you chose to back up during step 2. Once the backup is created, you can find it here.
CREATING A SCHEDULED BACKUP
To create a scheduled backup:
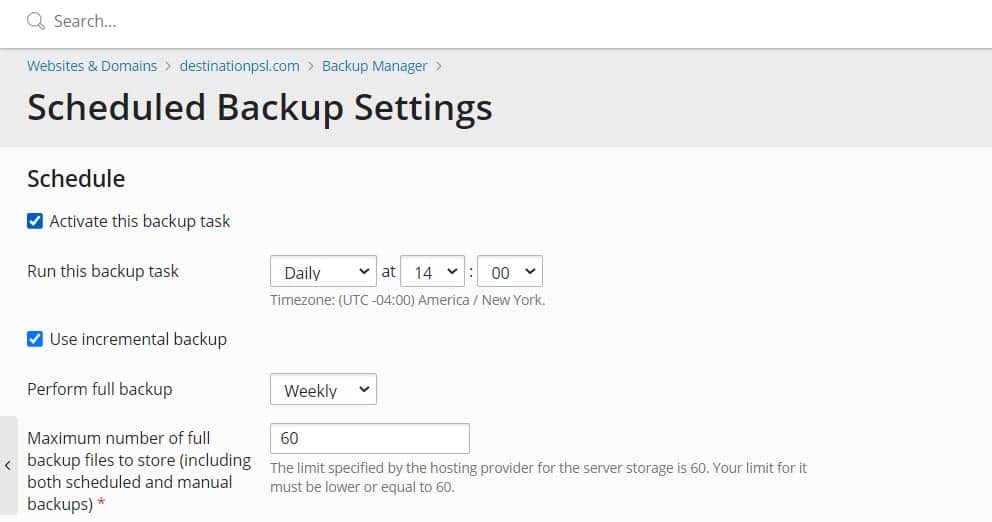
- Go to Websites & Domains > Backup Manager > Schedule and click the Activate this backup task checkbox.
- Under “Run this backup task” set the desired frequency and the time when the backup process must be started.
- Select whether to use incremental backups. By default, every scheduled backup is created as a full backup. Full backups contain all data of the specified types (you specify which data to back up during step 5).To allow the creation of incremental backups, select the “Use incremental backup” checkbox. Incremental backups contains only the files that changed since the last previously created backup. Incremental backups are created quicker and take less disk space than full backups. However, to restore an incremental backup, you must have the corresponding full backup and all previously created incremental backups available.Under “Perform full backup”, if you allow the use of incremental backups, specify how often a full backup must be created.
- Under “Keep backup files for”, type a number in the field if you want Plesk to automatically remove outdated full backups. Full backups stored longer than the specified time period will be automatically removed.If you do not want Plesk to remove full backups automatically, leave the field empty.
5. Under “Back up”, you can select which content you want to back up. Domain configuration is always included in backups. You can choose to exclude “Mail configuration and content” and/or “User files and databases” by clearing the corresponding checkboxes.
6. Under “Store in”, you can change where the backup must be stored. By default, backups are stored on the Plesk server. If you have configured remote storage, you can store backups in the remote storage by selecting the corresponding radio button.
7. If you selected the remote storage option during the previous step, you can split the backup file into volumes. Select the “Create a multivolume backup, volume size (MB)” checkbox, and then specify the volume size. This can be useful if the remote storage places restrictions on the maximum file size.
8. At this point, the backup is ready to be scheduled. There is a number of optional settings you can configure before scheduling the backup:
- To exclude log files from the backup, select the “Exclude log files” checkbox. This can significantly decrease the amount of disk space taken by the scheduled backups, especially if you have configured a daily backup and the log files take up a lot of space.
- To exclude specific files or directories from the backup, select the “Exclude specific files from the backup” checkbox. Type the path or paths to the directories or files you want to exclude in the field below. Paths must be relative to your home directory, for example:
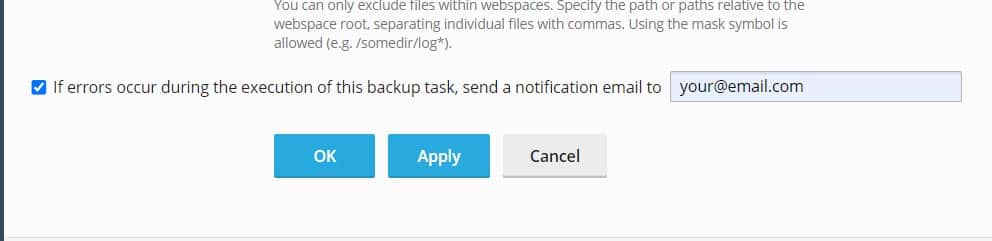
- If you want to be notified via email about errors that occur during scheduled backup creation, select the “If errors occur during the execution of this backup task, send a notification email to” checkbox. Make sure that the email address next to the checkbox is correct.
9. Click OK to create the scheduled backup.
Plesk will automatically create backups at the time and with the frequency that you specified.
CONFIGURING REMOTE STORAGE
By default, Plesk stores backups on the server. However, this presents a risk. If the server’s hard disk fails, you can lose both your website data and your backups. To avoid this, we recommend storing backups in remote storage. This topic explains how to configure remote storage for backups in Plesk.
You can configure the following types of remote storage:
- FTP storage
- Amazon S3 Backup storage
You can configure more than one remote storage. However, you can only use one remote storage at a time. When creating a backup, if you want to store it in more than one remote storage, create a backup once for every remote storage you want to use.
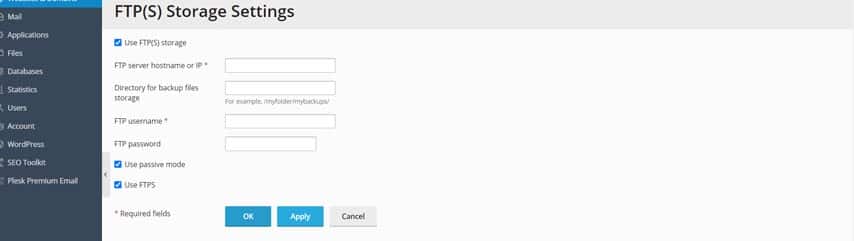
To configure the FTP storage:
- Set up a server that would act as the FTP storage. It must be possible to connect to that server from the Plesk server via FTP.
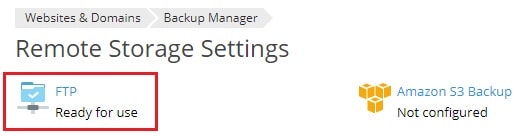
- Go to Websites & Domains > Backup Manager > Remote Storage Settings > FTP.
- Select the “Use FTP Storage” checkbox.
- Specify the settings for the server you set up during step 1, including the server’s hostname or IP address, the path to the directory for storing backups, and the FTP username and password.
- If the Plesk firewall is configured to ban incoming connections from FTP servers, select the “Use passive mode” checkbox. Make sure that the server you set up during step 1 supports the passive FTP mode.
- (Recommended) Select the “Use FTPS” checkbox to use an encrypted connection when transferring backups to the remote storage. This ensures that your data cannot be intercepted by a third party. Make sure that the server you set up during step 1 supports FTPS connections
- Click OK.
The FTP storage is configured. Now you can use it when creating a backup.
To configure the Amazon S3 Backup storage:
- Create an AWS account.
- Create a bucket.
- Create a directory for storing backups inside the bucket. Note the path to this directory and the bucket name. You will use them later to configure the Amazon S3 Backup storage.
- Create IAM User Access Key and download its ID and secret as a
.csvfile. Make sure that the access key user has theAmazonS3FullAccesspermission. If it does not, add it. - Go to Websites & Domains > Backup Manager > Remote Storage Settings > Amazon S3 Backup.
- Select the “Use the storage” checkbox.
- Copy the IAM User Access Key ID and the IAM User Access Key Secret from the
.csvfile downloaded during step 4 and paste them into the corresponding fields. - Type the name of the bucket created during step 2 into the “Bucket” field.
- Type the path to the directory created during step 3 into the “Path” field.
- Click OK.
The Amazon S3 Backup storage is configured. Now you can select it when creating a manual or scheduled backup.

To configure the Google Drive Backup storage:
- Create a Google account if you do not have one.
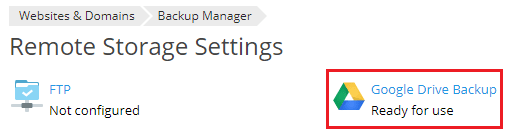
- Go to Websites & Domains > Backup Manager > Remote Storage Settings > Google Drive Backup.
- Sign in to the Google account whose storage you will use to store backups
- Click Allow to allow Plesk to view and manage the files in your Google Drive.
- Click the link to send the Google Drive authorization data to Plesk.
- Select the “Use the storage” checkbox.
- (Optional) By default, Plesk creates the “My Plesk” folder in your Google Drive and stores backups there. If you want to store backups in another location, type the desired path in the “Path” textbox.
- Click OK.
The Google Drive Backup storage is configured. Now you can select it when creating a manual or scheduled backup.
SECURING BACKUPS IN REMOTE STORAGE WITH A PASSWORD
You can secure backups stored in remote storage with a password. Doing so encrypts the passwords stored in the backup, such as mail account passwords or database user passwords. Even if a third party obtains a backup, they will not be able to get the passwords stored inside.
When you restore a password-secured backup, you need to provide the password. If you cannot, all passwords stored in the backup are generated randomly.
To secure remote storage backups with a password:
- Configure at least one remote storage.
- Go to Websites & Domains > Backup Manager > Remote Storage Settings. The section “Backup security settings” has become available.

3. Under “Password Protection”, click the “change” link next to “Disabled”.
4. Select the “Use password protection (recommended)” checkbox.
5. Type in the password in the corresponding fields.
6. Click OK.
Now all backups stored in remote storage will be secured with the password.